ITANNA Spaces Tutorial
In order to get you started with the ITANNA Spaces service, we guide you through registration, project creation and first tracing steps below. General information and tutorials for CATMAID, the software we use for collaborative image annotation, can be found on its website www.catmaid.org.
ITANNA
We want ITANNA to be a place where new research can happen and existing research can be shared and explored. To facilitate this we provide an online platform, based on the collaborative open-source web platform CATMAID. Apart of giving access to large image datasets, it provides a rich environment for neuron reconstruction and the creation of synaptic (and other) networks. CATMAID provides many tools for visualizing and analyzing data that fits into that category.
Many datasets are available as read-only resources from our server and can be browsed without restrictions. In order to create own data, we require users to log in using an ORCiD account. ORCiD is widely used in the research community, is free and provides a shared identity for research software and publications.
Please note that ITANNA is research grate software. We do our best to keep the lights on and be be responsive, should problems arise, but can make little guarantees. We can assure however that anybody will always have the option to export their data and load it into their own CATMAID server.
1. Create an ORCiD account
As mentioned above, an ![]() account is needed. If you don’t have one already,
head over to orcid.org and find the “Register” link in the upper
right corner or click here.
account is needed. If you don’t have one already,
head over to orcid.org and find the “Register” link in the upper
right corner or click here.
2. Open ITANNA Spaces
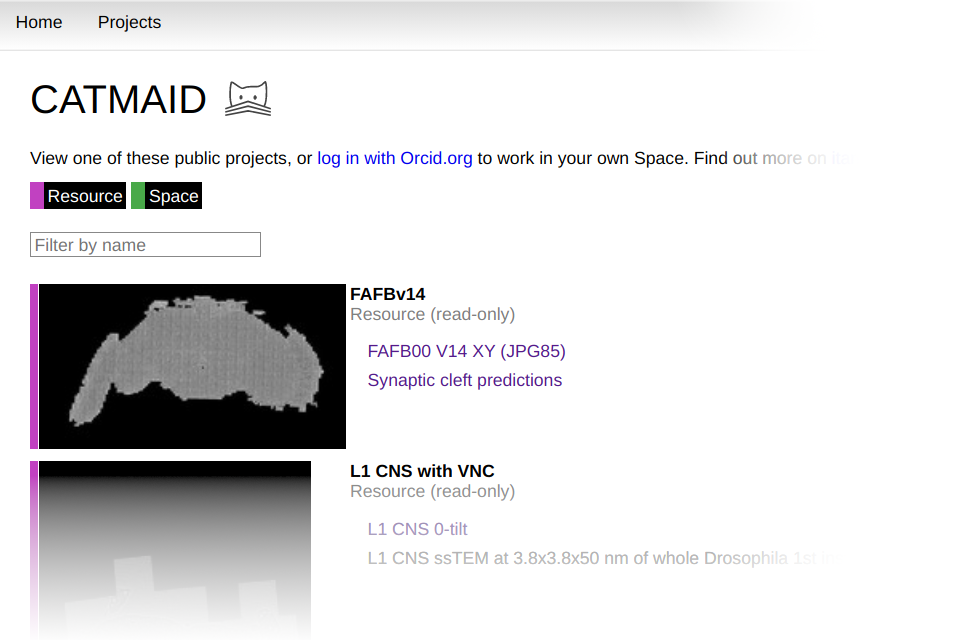
The ITANNA Spaces website is publicly accessible. Without a user account you will be able to browse public datasets read-only (so called resources, shown with a magenta bar in the overview). If you direct your browser to this CATMAID instance, you should be greeted with a view like this:
3. Sign-in to ITANNA Spaces
With an ORCiD identifier created, it is now possible to sign-in to ITANNA Spaces, our public CATMAID instance you just opened. Click on the Login with orcid.org link in the upper right corner of the CATMAID user interface:

This will make your web-browser to visit the ORCiD log-in page. Once you have successfully logged in, your browser will send you back to the ITANNA Spaces CATMAID instance.
4. Open a dataset
After singing in with your ORCiD account you will start out by seeing the same datasets like when you are not signed in. Presently, all public datasets are visible without requiring a log-in. Each dataset is managed in its own read-only CATMAID project, which are called a resource and indicated through a magenta bar in the project overview. We will see in the next section how users can create private (or public) projects and manage access to them (called spaces).
The initial project overview provides a filter to quickly find specific projects. If you find yourself repeatedly visiting the same resources (or spaces), you can click on the star icon on its preview image to mark it as a favorite. Favorite projects will appear first in this view.
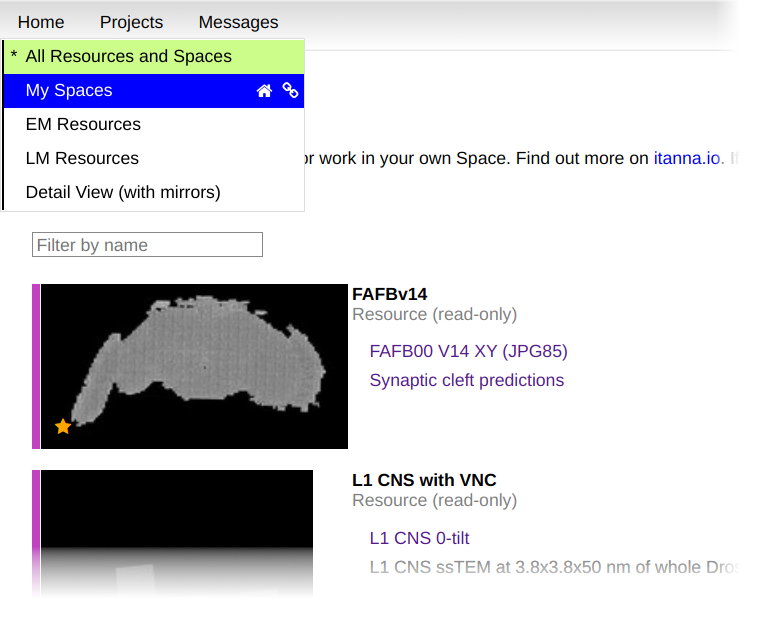
Apart from the view that shows all visible projects, others are available as well. They are accessible through the context menu that appears when hovering the mouse cursor of the Home link in the upper left corner of CATMAID. For instance, the My Spaces view will show all spaces you are part of (read-write projects) and the projects you marked favorite. The menu also allows to mark a particular view as default view that is opened after log-in, by clicking on the home icon to the right of each entry. Both the menu and the favorite star are shown below:
Let’s open the first dataset, FAFBv14, by clicking either the preview image or FAFB00 V14 XY (JPG85) image stack link shown for the first project. This will open CATMAID’s image browser for this project. In this mode left and center mouse button will pan the view left and right and the mouse wheel scrolls through Z. The period sign and comma keys can also be used to change one section at a time. With plus and minus, the image data can be zoomed in and out.
There are more key shortcuts available that can be shown by pressing F1 or clicking on the blue question mark button in the top toolbar (fourth icon button). Additionally, context aware help is available by clicking the question mark icon in the upper right corner of CATMAID.
5. The Tracing Tool
Besides image data, CATMAID can also work with skeleton data and many projects do have published neurons available. To open the Tracing Tool, click the neuron-like icon in the top toolbar. This will provide access to more tools, but they aren’t the focus here. Instead, still with he FAFBv14 dataset open, scroll to Z = 2740 with the Tracing Tool enabled. If you are zoomed out you should see various magenta dots appear:
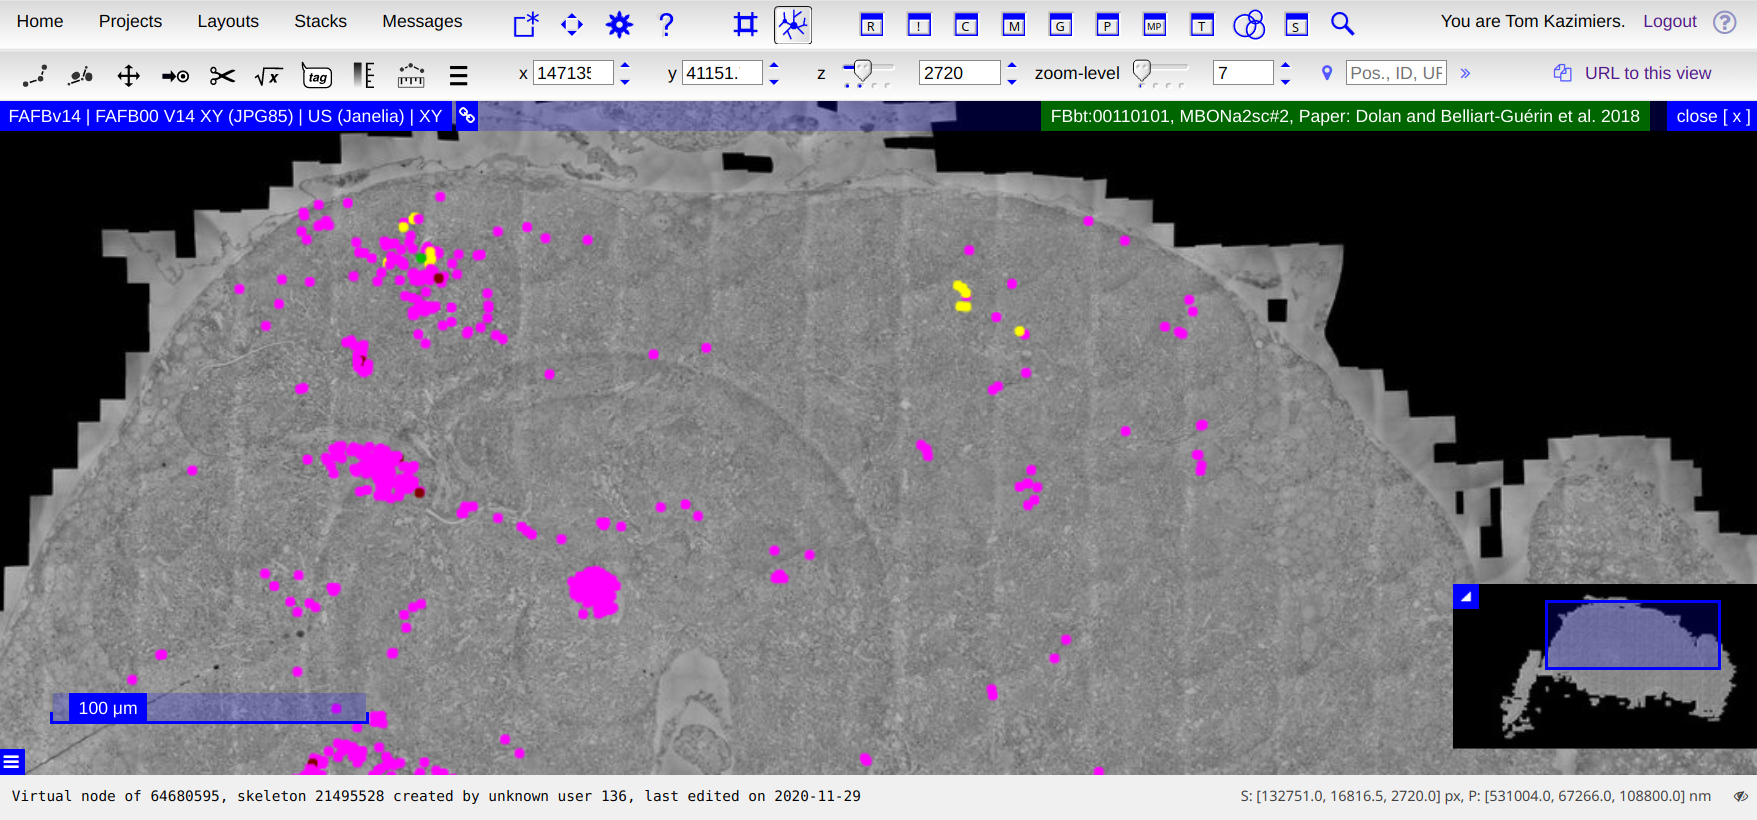
These are skeleton nodes and form line segments to represent neurons and sometimes other structures. In this screenshot, I selected a node by clicking on it. The selected node appears in light green and all other nodes that are part of the same skeleton are shown in yellow. The name of the active skeleton is show with a green background in the upper right corner of the image data viewer (“stack viewer”).
Creating new nodes or modifying existing data is in this read-only resource not allowed. In order to do that, we need to create a new space (read-write project).
6. Create your own space
A space is a project where you have full read-write access. In fact, you create a space, you even have admin access that allows you to configure who has access to your space.
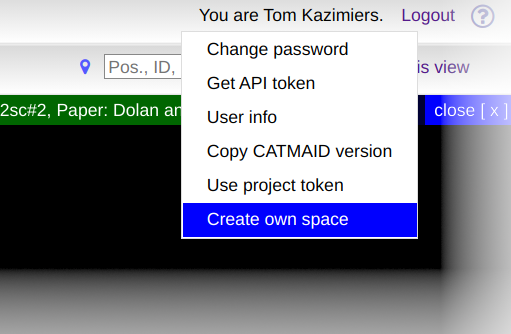
To create a new space, you need to have a project open to act as a template, usually this is a read-only resource like the FAFBv14 resource that we still have opened. The option to create a new space can be accessed from the user actions menu that appears when hovering the mouse cursor over your name in the upper right corner:
Clicking it will open a new dialog that allows to configure the details of your new space (which can also be changed at a later time after the space is created):
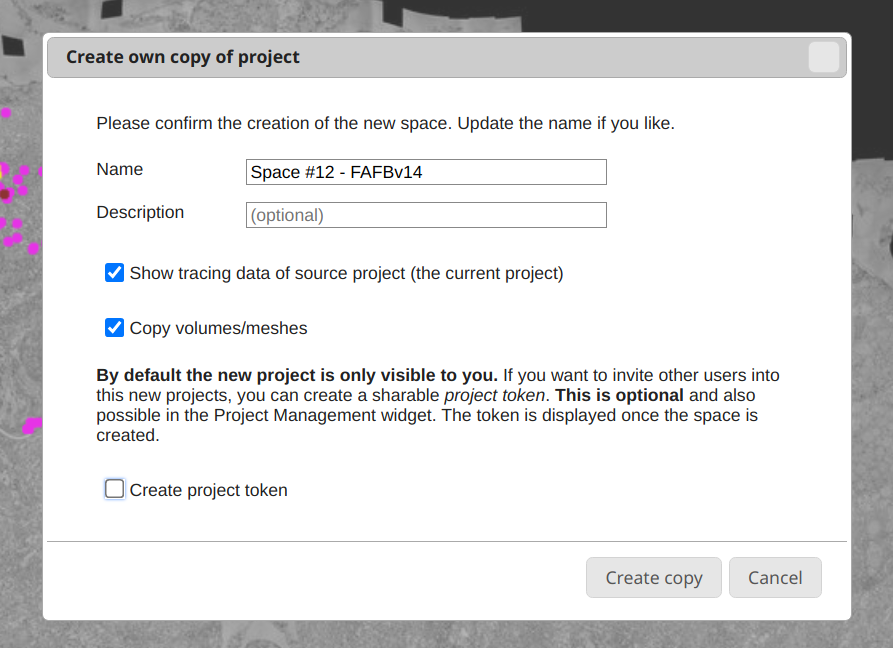
As you can see, CATMAID will offer a default name for the new space, but it is recommended to pick a clear name in order to make finding it again easier. By default, the new space will also be configured in such a way that the tracing data from the origin project (here: FAFBv14) will be shown as a remote data layer. Also, all existing meshes will be copied into the new project, if the respective checkbox isn’t unchecked.
It is possible to manage already basic access permissions through this dialog as well. If you intend to give other users access to your new project, click on the Create project token checkbox:
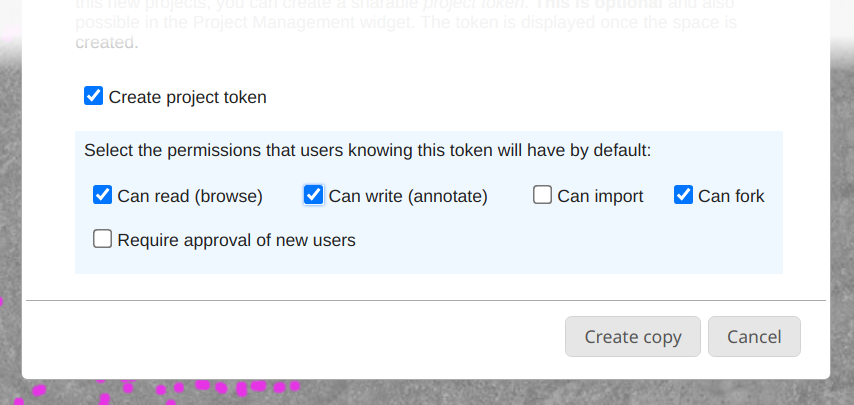
This will show a set of default permissions that can be attached to a new project token, which is created after the new space is created. A project token acts an invitation code to your space. If you send the created project token to another user, they can use it to gain access to your project with the specified permissions. The next section will have more details on access permissions.
Clicking on Create copy will create your new space and offers you to switch right to it once it is ready:
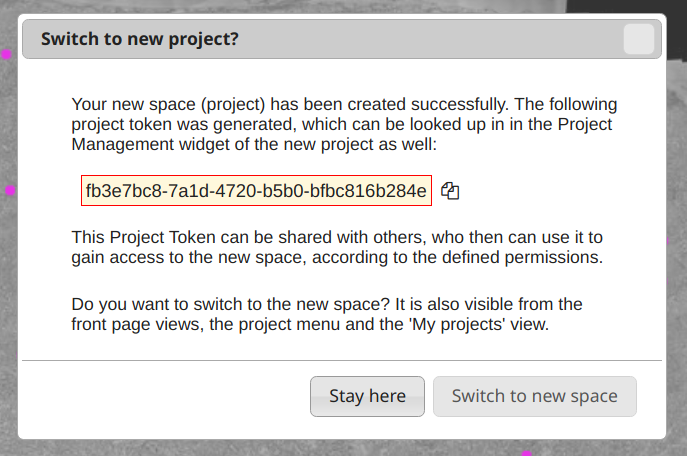
Clicking on Switch to new space will open your new project right away and close the current one. You will have full write permissions. The Project Token can be copied and sent to other users. We will see in the following section how project tokens can be used.
7. Your new space
With your new space available, you can access it either from the front-page overview, the My Spaces view or the Projects menu in the top toolbar. After reloading the ITANNA website, your project will of course continue to exist, along with all the changes done in it. On the front-page project views, you will notice that the new space is now marked with a green bar, indicating read-write access:
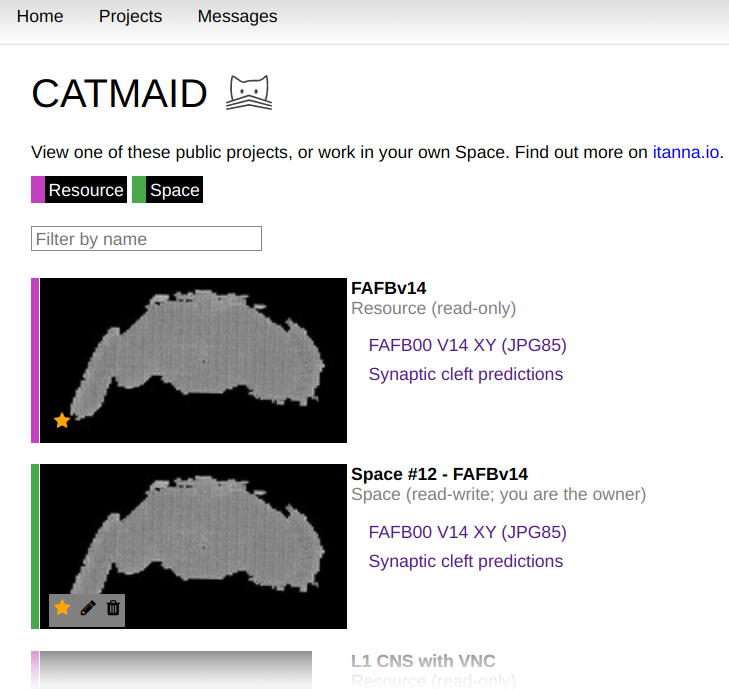
You will notice that on space you have administrative permissions, you also get access to management tools when hovering your mouse cursor over the thumbnail. The pen icon allows you to change the project name and description and the trash can icon allows you delete your space along with all your data.
Clicking your project thumbnail is exactly the same as clicking on the Switch to new space button in the confirmation dialog after the space was created. To continue with this tutorial, make sure your newly created space is open.
As project admin you can change project properties and permissions also from within the open project. This is done through the Project Management widget.
Widgets in CATMAID are simple window based tools that can be opened and closed on demand. While some of them are accessible through the top toolbar when w.g. the Tracing Tool is active (see below), a more general way to open new widgets is by using the Open Widget dialog. It can be opened through the first icon button in the top toolbar (square and asterisk, 1. in screenshot below) or by pressing Ctrl + Space:
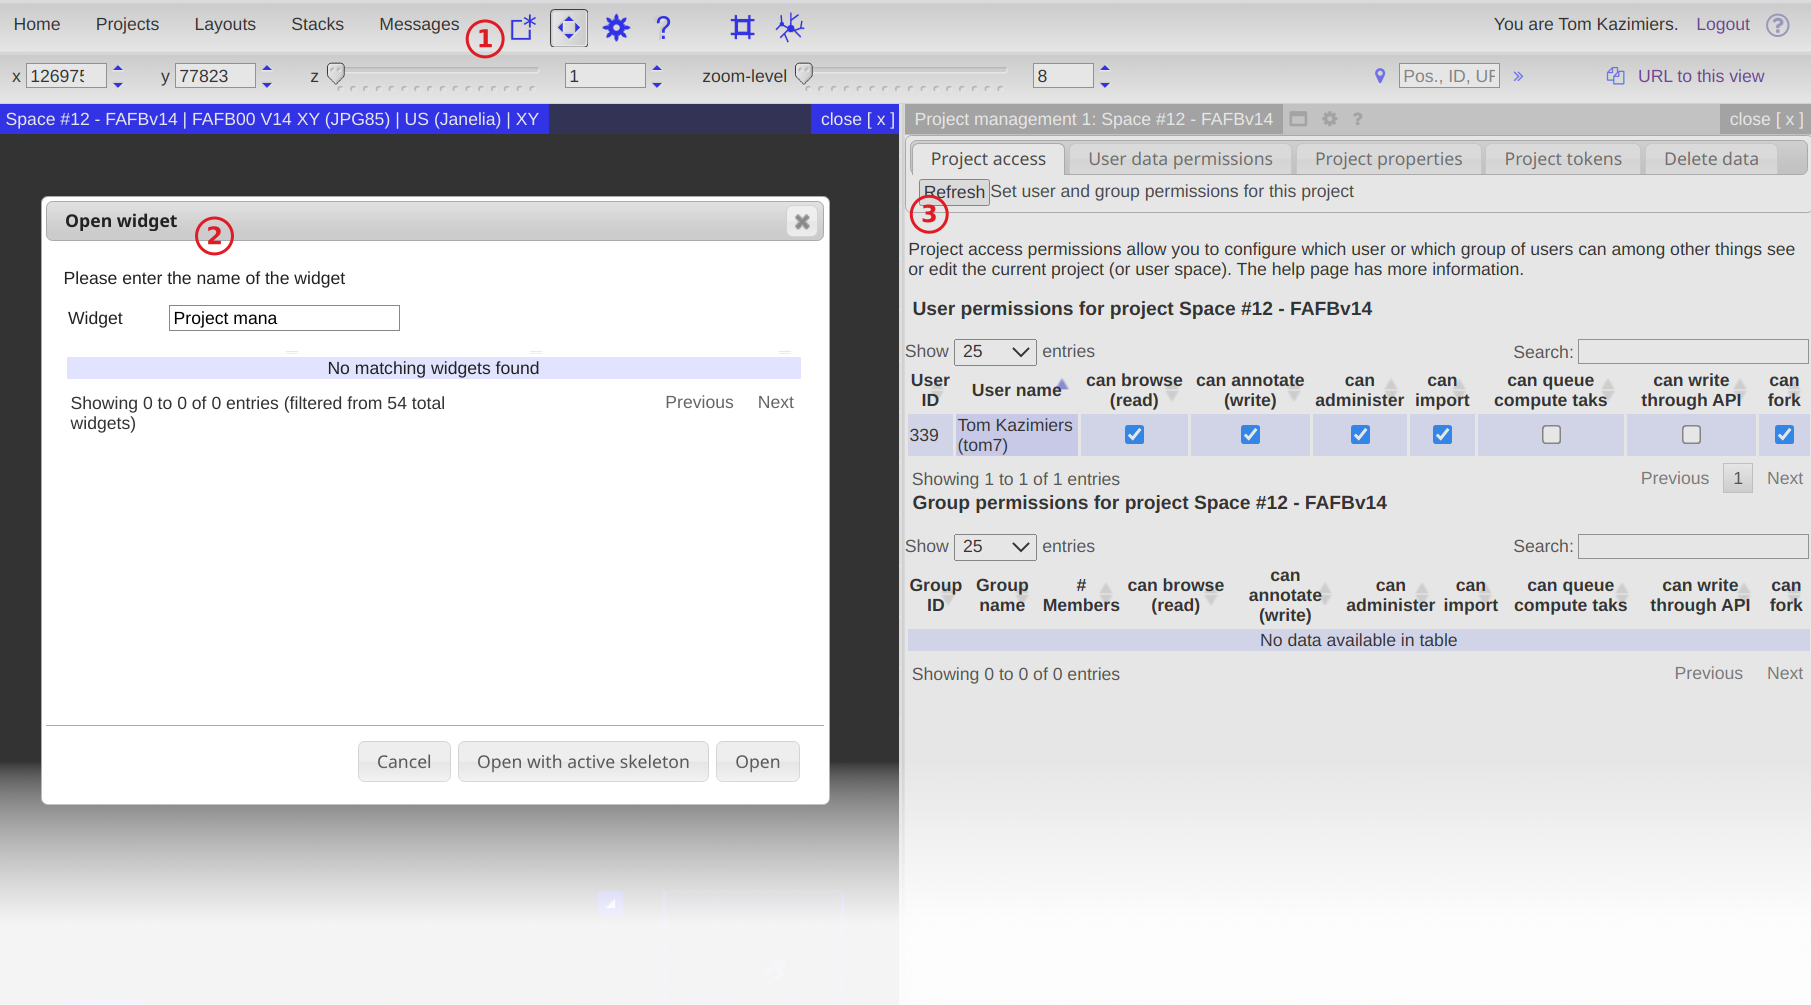
Initially, the Open widget dialog (2. screenshot above), will show all available widgets. In order to find a widget, you can use the filter text field. The Enter key will open the top result, but the up and down keys allow to cycle through the list and make other results the active one. Double clicking on a result will open the respective widget, too. In this case we opened the Project Management widget (3. in screenshot above), which gives access to configuration options like project permissions and other project details. The next section takes about permissions in more detail.
In the first tab of the Project Management widget, all current permission for this project are shown. Initially, this will only contain your user. As new users join your project through Project Tokens, they will be listed here as well. The individual permission checkboxes can be toggled to change the respective permission. For instance, to give your user the permission for write access through the API, you can click the respective checkbox. To learn more about the individual permissions, have a look at the CATMAID documentation. Most important are the can browse (read) and can annotate (write) permissions. Also, make sure to not remove the can administer from yourself, or you lose your admin permissions (after asking for confirmation).
8. Share your space with others
As we have already seen, resources are read-only projects and spaces are read-write projects that were created by a user. By default spaces created by you are only visible to you. This can be changed by giving individual users or user groups permissions on your space. These permission can be assigned directly or they can be attached to so called Project Tokens, which then can be applied by other users, causing them to transfer their stored permissions to the user.
Project Tokens have no limit how often they can be applied. It is however possible to delete existing project tokens and create new ones. It is possible to have multiple project tokens defined, with different permissions attached to them. The Space Creation Dialog in step 6 provided one way to create Project Tokens. Once a space is created, permissions, project tokens and other project properties can be configured in the Project Management widget. The last section explained how to open it.
To view existing Project Tokens or create new ones, select the Project tokens tab in the Project Management widget. If you have created a Project Token during space creation, this view will look similar to this:

As you can see, this table lists all relevant information on a token and allows to copy the token, which could then be given to users. New tokens can be created with the help of the Add token button in the widget toolbar close to the tab controls. This will open a dialog which allows you to configure the new token.
9. Apply a project token
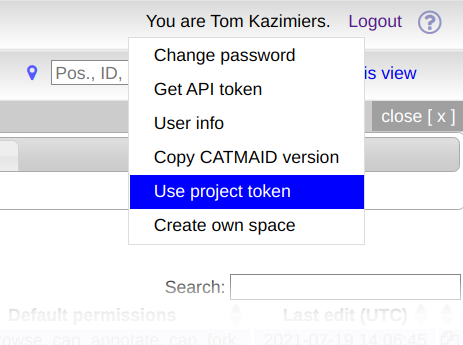
To use a project token and gain the access defined by it, users need to hover their mouse cursor over their name in the top right corner and click on Use project token:
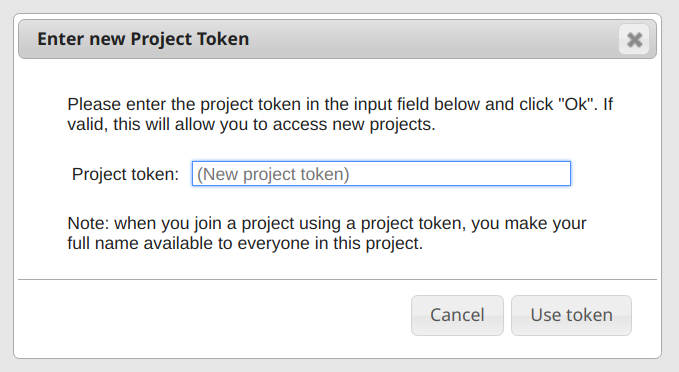
This will open a new dialog that allows users to enter a project token the received:
After entering a valid token and clicking Use token, users will have the defined access and see the respective project in the project overviews. Admins will then see new users also in the Project permission table in the first tab of the Project Management widget.
10. General CATMAID usage
There are lot of features and tools in CATMAID that we haven’t discussed here. As mentioned initially, there is a small help button available in the upper right corner of the CATMAID interface. It shows general context-aware information on how to work with the user interface. The F1 key and the question mark button in the top toolbar will open a list of keyboard shortcuts. Depending on the current tool (navigation, tracing, etc.), different shortcuts are shown. Some individual widgets come with an integrated help, which is accessible through the question mark icon in their title bar.
To learn more about how to start tracing neurons or other structures using skeletons, have a look at the collection of videos in the CATMAID documentation.
11. Load data from other/remote projects
Everything that is created in your new CATMAID space is by default only visible to you. It is however possible to mark projects as readable (and writable) to others. Projects that have been made visible can then be used as additional datasources in extra layers in stack-viewer windows (the 2D image and tracing views). Alternatively, remote data can also be loaded in their own stack-viewer. In both the extra layer and the own viewer, the data is read-only. This allows to load e.g. additional image data or tracing data from other CATMAID projects, which could also live on an entirely different server.
We will look at two different examples that show how both additional image data and remote tracing data can be loaded into your CATMAID space. Open the FAFBv14 space you created before by either clicking on the preview image or the first image stack reference named “FAFB00 V14 XY (JPG85)”. Go to a location in the center of the brain (to see more data), e.g. z = 4000 and change the zoom level to e.g. 4 in order to see more details.
a). Extra image data
The tutorial space includes additional image layers, which can be loaded on demand. The ones available in a particular project are listed in most data views (the different front pages that list visible projects) as well as in the Stacks menu in the top toolbar:
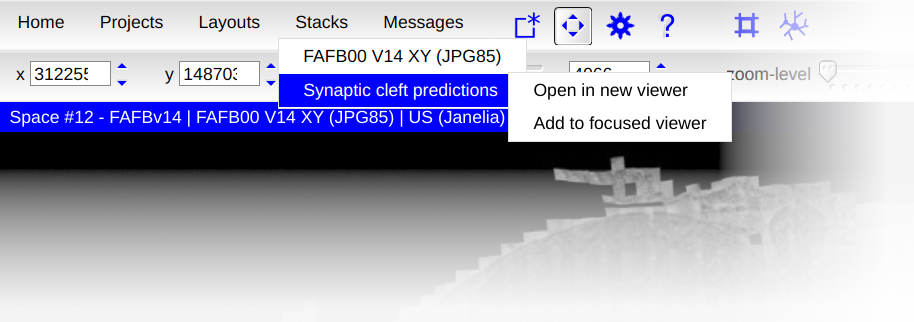
In the case of a FAFBv14 based space, this extra image stack will show synaptic cleft predictions. The first entry in this menu is the already loaded dataset. It is is of course possible to load the same stack multiple times, but in this example the goal is to add an additional image layer that shows different information. Click on the “Add to focused viewer” entry in the submenu of the “Synaptic cleft predictions” entry of the Stacks menu. If you are zoomed in a bit and at a more central Z, your viewer should might display something like shown at location (1) in the screenshot below: white lines (the synaptic cleft locations) on a black background.
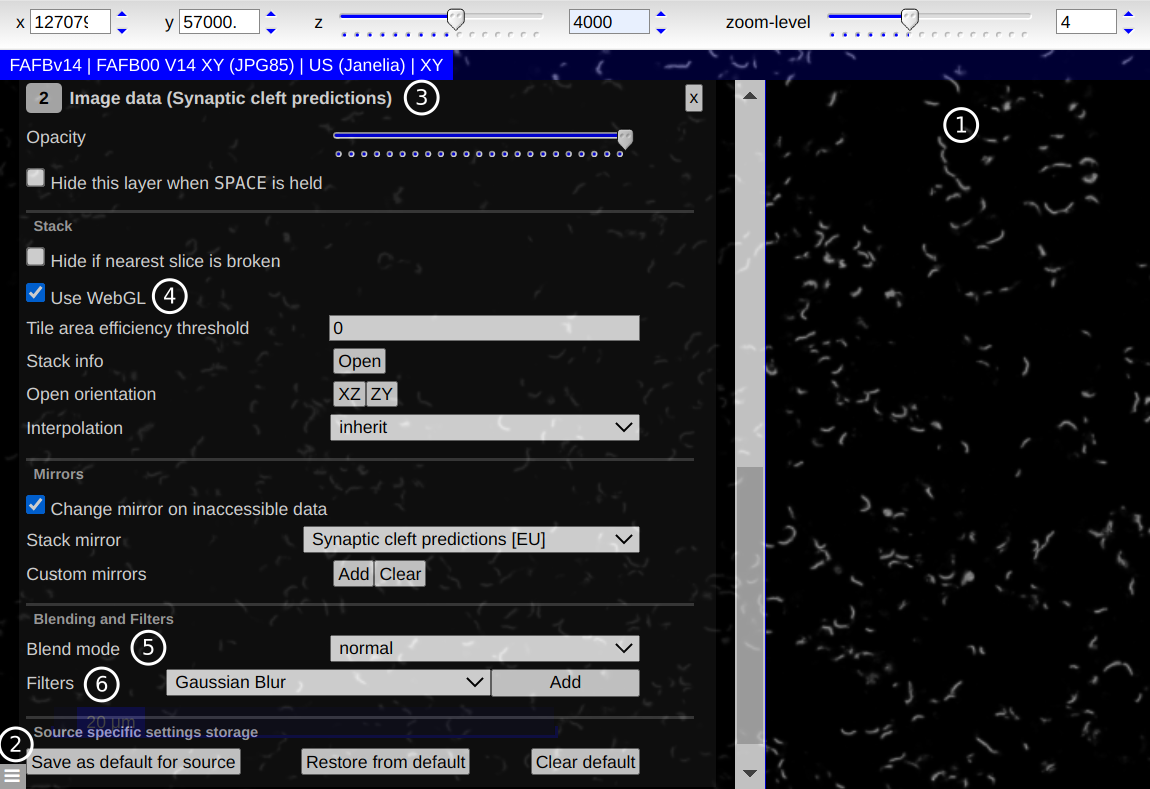
If you instead see the image data just like before and colored synaptic clefts (like in the next image), no further adjustment is needed. If however, you see image data and no synaptic cleft data at all, try zooming in some more.
If you see only a black view, open the layer settings by clicking on the options button in the lower left corner of the stack viewer (location (2) above). Alternatively, you can press Alt + Space. Find the layer for the newly added image data (location (3) above). Make sure “Use WebGL” is enabled, both for the new stack (location (4) above) and the image data layer.
In order to make both the image data and the new layer visible, a different blend mode has to be selected. From the “Blend mode” drop-down menu, select “add” (location (5) above). This should make both the image data and the synaptic cleft data visible at the same time, as shown in the screenshot below:
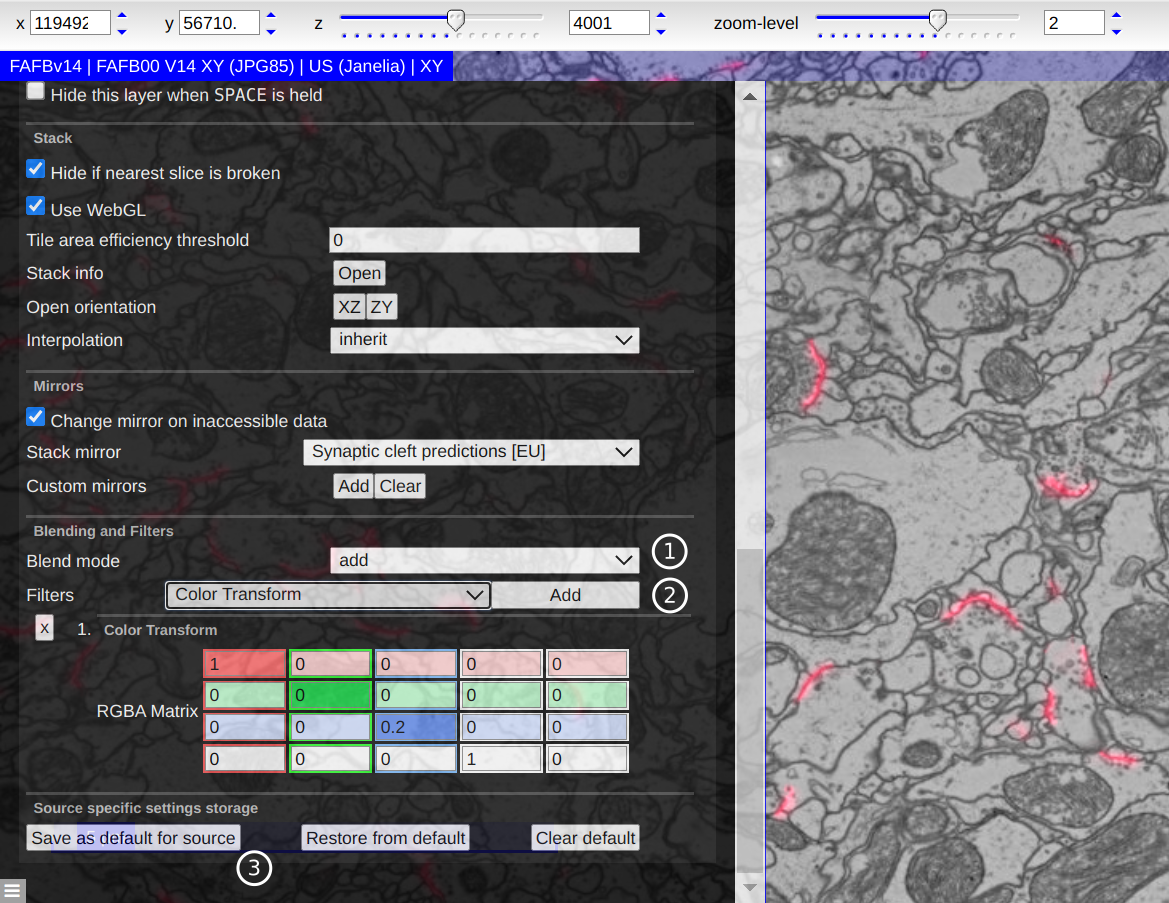
As can be seen, at location (1) the blend mode “add” has been selected and at location (2) the “Color Transform” filter has been selected. With the filter selected, press the “Add” button right next to it to use the filter and add controls for it in terms of a color matrix. This matrix can now be adjusted to change the color of the synaptic cleft data. The easiest form of adjusting the color with this matrix is to change the values on the diagonal only.
If you are happy with a setting, you can save it as default for this image stack by clicking on the “Save as default for source” button, shown at location (3) above.
b) Tracing data of other projects
Similarly to additional image data, CATMAID allows you to load tracing data from other sources. Tracing data as well can be added both as a new layer to an existing viewer or its own new viewer. Other tracing data sources are loaded through the “More tools” menu, accessible through the last icon button on the left side of the second toolbar. The “Remote data” entry lists all known local and remote CATMAID datasources and for each one the visible projects:
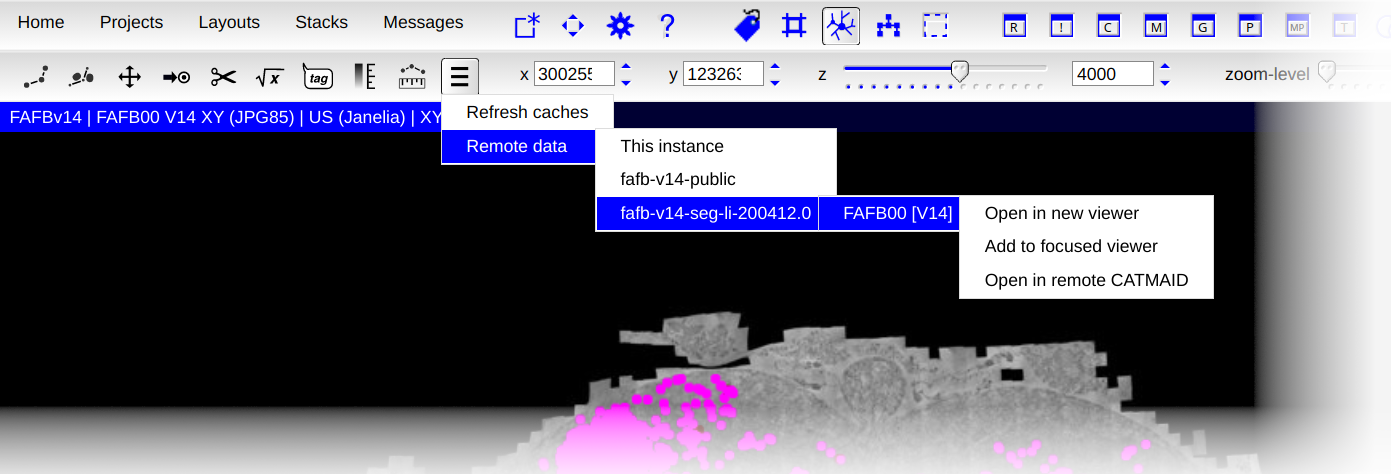
In this example a separate CATMAID instance is selected and from it the latest skeletonization of Peter Li’s segmentation of the FAFBv14 image data. Clicking “Add to focused viewer” will add it as a layer to the existing viewer:
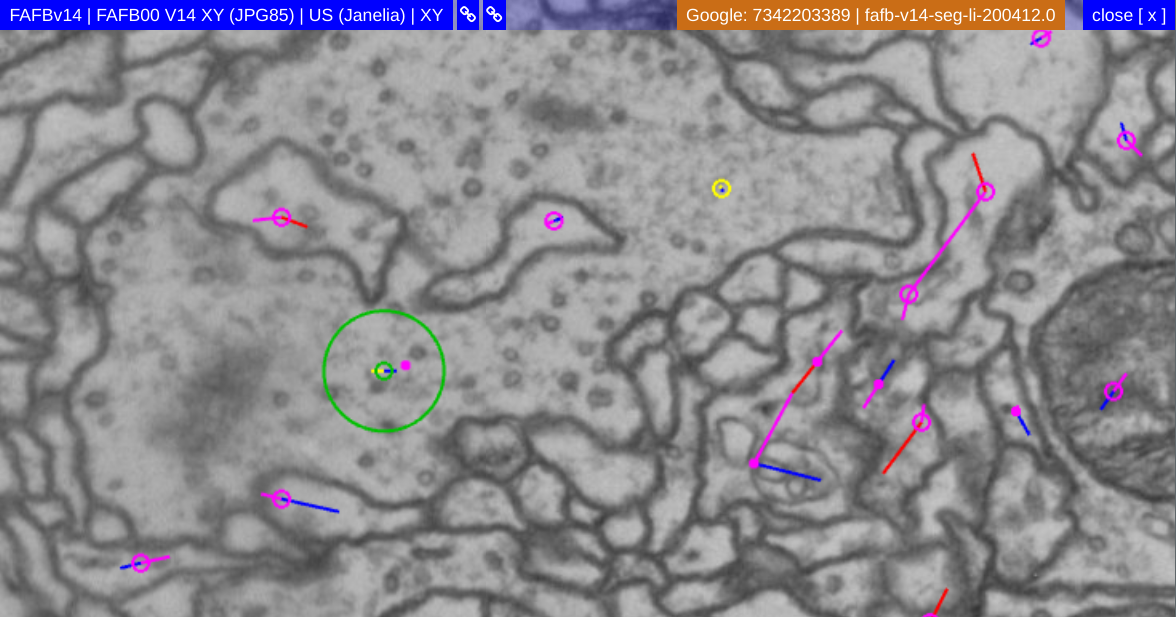
Remote tracing data is not shown with a point by default, but rendered as a circle. This can be changed in the Settings Widget, if wanted. Also note the name tag in the upper right corner of the stack viewer. Remote tracing data is shown with an orange background rather than a green one. For remote tracing dating, the name tag will also show the source project name.
At the moment, not all CATMAID widgets can work with remote skeletons and circuits. Many common widgets like the 3D Viewer or the Measurments Table are able to work with remote skeletons though.
It is possible to import remote skeleton data into the current project/space. With a remote skeleton selected, the easiest way of doing this is to open the “More tools” menu from the Tracing Tool toolbar again and click on “Import active skeleton”, like shown in the next screenshot:

This will open a preview window, showing the full remote skeleton. After confirming the import, the remote skeleton will be available locally and can be modified. CATMAID will remember where the skeleton originally came from.